How to integrate okta with react /
Implementing Okta authentication in a React app

1).Before starting implementing react first create okta demo account using react website
a).website

b).register page

c).after login go to dashboard page

d).after that create application in okta account

e).after click on create application page and create application (for open SS0-signle sign on need
to create two application one for API like dot, python, php other for front end like react or angular)
to create two application one for API like dot, python, php other for front end like react or angular)
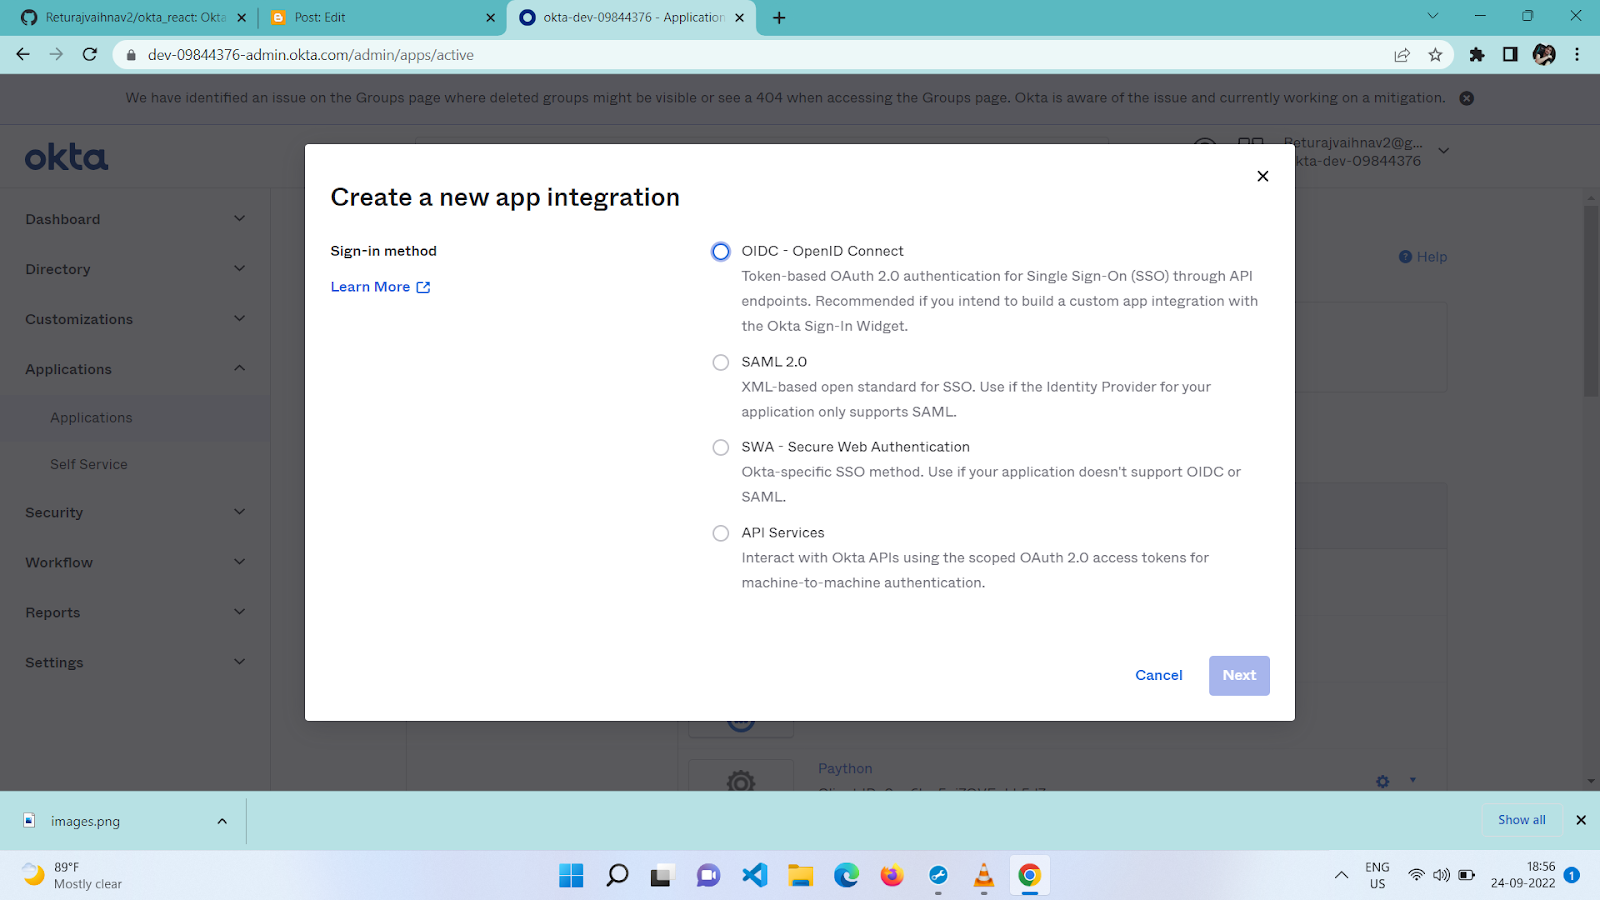
f).in this list first select open id connection then select type of application first i select API app
for backend application


h).after successfully create app just go to security tab and select api from side menu

i).then go to trusted origin tabs and add your host of api and frontend site where its hosted

step ->application ->create app ->select openID ->select single page application

k).finally press submit to create application

l).after creating application of front end just need to assign added user
1)create user : go to dictionary->add people

and now click on add person and fill form and save to create new users

if you want to allow register user facility from login page just need to follow steps and

after create user assign a user or group to perticular app just need to follow step
application ->assign to app ->choose app from left side and then choose user from list

and then finally press save button

m).now you need to follow final steps use "issuer" and app key from your application
for copy issuer url just need to follow steps
goto security ->select api->authorization server tab->issuer url
for example: "https://dev-09844376.okta.com/oauth2/default"

for client id just need to follow steps
applications-> application ->copy client id from app

___________________________________________________________________________________________
Now you need to programing in react just follow
a).first you need to add browser routing to top level of app component

import React from 'react';
import ReactDOM from 'react-dom/client';
import './index.css';
import App from './App';
import reportWebVitals from './reportWebVitals';
import { BrowserRouter as Router } from 'react-router-dom';
const root = ReactDOM.createRoot(document.getElementById('root'));
root.render(
<React.StrictMode>
<Router><App /></Router>
</React.StrictMode>
);
// If you want to start measuring performance in your app, pass a function
// to log results (for example: reportWebVitals(console.log))
// or send to an analytics endpoint. Learn more: https://bit.ly/CRA-vitals
reportWebVitals();
b).then setup app.js component

import { SecureRoute, Security, LoginCallback } from '@okta/okta-react';
import { OktaAuth, toRelativeUrl } from '@okta/okta-auth-js';
import { BrowserRouter, Route, useHistory } from 'react-router-dom';
import './App.css';
import Home from './feature/Home/Home';
import Dashboard from './feature/Dashboard/Dashboard';
import { withRouter } from 'react-router-dom';
import { useCallback } from 'react';
const App = () => {
const oktaAuth = new OktaAuth({
issuer: 'https://dev-09844376.okta.com/oauth2/default',
clientId: '0oa6lpvx0yt0wRwPi5d7',
redirectUri: window.location.origin + '/callback',
});
const customAuthHandler = () =>{
oktaAuth.signInWithRedirect()
}
const history = useHistory();
const restoreOriginalUri = useCallback(async (_oktaAuth, originalUri) => {
history.replace(toRelativeUrl(originalUri || '/', window.location.origin));
// eslint-disable-next-line react-hooks/exhaustive-deps
}, []);
return (
<Security oktaAuth={oktaAuth} restoreOriginalUri={restoreOriginalUri} onAuthRequired={customAuthHandler} >
<SecureRoute path='/' component={Home} />
<SecureRoute path='/Dashboard' component={Dashboard} />
<Route path='/callback' component={LoginCallback} />
</Security>
);
}
const AppWithRouterAccess = withRouter(App);
const RouterApp = () => (<BrowserRouter><AppWithRouterAccess /></BrowserRouter>);
export default RouterApp;

import React, { useState, useEffect } from 'react';
import { useOktaAuth } from '@okta/okta-react';
const Home = () =>{
const { authState, oktaAuth } = useOktaAuth();
const [userInfo, setUserInfo] = useState(null);
useEffect(() => {
if (!authState || !authState.isAuthenticated) {
setUserInfo(null);
} else {
setUserInfo(authState.idToken.claims);
}
}, [authState, oktaAuth]); // Update if authState changes
const logout = async () => {
await oktaAuth.tokenManager.clear();
localStorage.clear();
sessionStorage.clear();
await oktaAuth.signOut();
};
if (!userInfo) {
return (
<div>
<p>Fetching user profile...</p>
</div>
);
}
return (
<div>
<div>
<header as="h1">
{' '}
My User Profile (ID Token Claims)
<br/>
your Access Token is "{ authState.accessToken.accessToken }" <button onClick={ ()=>logout() }>logout</button>
</header>
<p>
and is now stored in local storage.
</p>
<p>
This route is protected with the
{' '}
<code><SecureRoute></code>
{' '}
component, which will ensure that this page cannot be accessed until you have authenticated.
</p>
<table>
<thead>
<tr>
<th>Claim</th>
<th>Value</th>
</tr>
</thead>
<tbody>
{Object.entries(userInfo).map((claimEntry) => {
const claimName = claimEntry[0];
const claimValue = claimEntry[1];
const claimId = `claim-${claimName}`;
return (
<tr key={claimName}>
<td>{claimName}</td>
<td id={claimId}>{claimValue.toString()}</td>
</tr>
);
})}
</tbody>
</table>
</div>
</div>
);
}
export default Home;